In this article, we’ll cover how to configure, test and Troubleshoot SMTP Relay in Office 365.
What is SMTP?
SMTP is a standard language (protocol) used by all the applications on this planet to send emails.
What is SMTP Relay?
SMTP Relay is a service, which accepts email from the email sender program and forwards it to the email receiver server or another node.
What is Office 365?
Office 365 is a subscription-based service that ensures you always have the most up-to-date modern productivity applications like Word, Excel, Outlook, PowerPoint, Publisher, OneNote, OneDrive, SharePoint, Exchange, Microsoft Teams, Skype for Business, Power BI, Kaizala, PowerApps, etc from Microsoft.
 Send Unlimited Bulk Emails at $20. Signup for free.
Mandatory requirements for SMTP Relay with Office 365
- The sending app must connect to the Office 365 servers on port 587
- The application which you are using for sending the emails must support TLS
- The sending app must authenticate with Office 365. The “SMTP relay server” that wants to relay mail to the Office 365 mail infrastructure will need to provide credentials (username + password) using the basic authentication protocol.
- Mail server IP address\Host name – the “SMTP relay server” that wants to relay mail to the 365 mail infrastructure, will need to know what is the Pubic host name of the 365 mail server (smtp.office365.com).
Setting Up Office 365 Connector for Mail Flow
We need to set up connectors which is nothing but the set of instructions that customize the way your email flows. It regulates the flow of email to and from your Office 365 organization.
There are mainly two scenarios for which you required to set up connectors to route emails between Office 365 and on-premises Exchange servers.
#First: Your mailboxes in your on-premises Exchange servers and you want to use Exchange Online Protection for protecting email from spam filtering and malware protection.
#Second: You have mailboxes in both Office 365 and on your on-premises Exchange servers. And you want to enable mail flow between these two environments.
The below image shows how Office 365 connector works with your on-premises Exchange Servers in both scenarios.
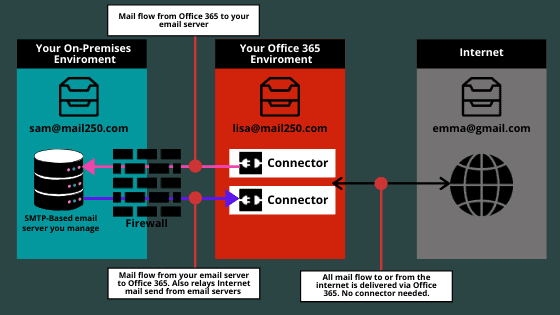
In the above image, there are two Sam and Lisa employees from the same company. Lisa has a mailbox which is located in Office 365 and Sam has a mailbox in Exchange Server that you manage.
They have a client name, Emma. And, both Sam and Lisa exchange emails with Emma. Emma’s email address is from Gmail. Now:
- While an email is sent to Sam and Lisa, connectors are required.
- Likewise, when an email is sent to Sam and Emma, connectors are required.
- And when an email is sent to Lisa and Emma, no connector is required.
Therefore, if you own your on-premises Exchange Server and Office 365 subscription, you must be obliged to set up connectors. Without connectors, you will not be ready to send or receive emails.
How to Configure Connectors?
You need to configure two connectors in order to route the emails correctly.
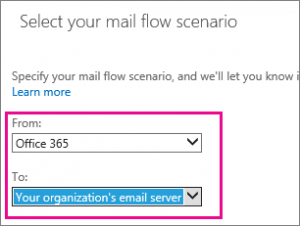
#1: One connector will route emails from Office 365 to your on-premises Exchange Server
In order to create a connector in Office 365, click Admin, and then click Exchange to go to the Exchange admin center. Next, click mail flow, and click connectors. Click Add, and follow the instructions in the wizard to create a connector from Office 365 to your on-premises Exchange servers.
#2: And, the second connector will route emails from on-premises Exchange Server to Office 365
In order to create a connector in Office 365 portal, click Admin, then click Exchange, and then go to the Exchange admin center. Next, click mail flow, and then click connectors. Click Add, and follow the instructions in the wizard to create a connector from your on-premises Exchange servers to Office 365.
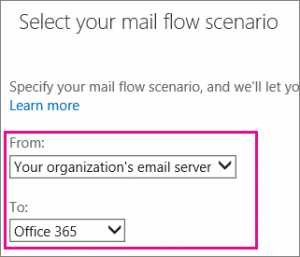
After completing the Wizards in both connectors, you will find two connectors created in Office 365 connectors.
Configure Internet Information Services (IIS)
The IIS SMTP server can fulfill the need for the mandatory requirements of Exchange Online for TLS & Authentication. In the scenario, the IIS SMTP server will be configured with two “interfaces”:
- The interface that receives requests from LAN Mail allowed Devices\Applications – this “interface,” will allow\accept the mail relay requests from LAN Mail enabled Devices\Applications, without the need for authentication (anonymous) and the communication channel that we use for communicating with the LAN Mail enabled Devices\Applications is based upon the SMTP protocol (no need for encryption).
- The interface that communicates with the Exchange Online – The other “leg” or interface will be used by the IIS SMTP server for the communication with the Exchange Online using: TLS and implement the requirements for authentication.
Part 1 – Implementing SMTP mail relay using IIS server
In this section, we will examine all the settings and pre-requirements that we need to fulfill for using IIS SMTP as a mail relay server.
SMTP Mail Relay pre-requirements
1. IIS SMTP User credentials
The credentials that the IIS SMTP use for communicating with the Exchange Online could be any Office 365 user credentials that have a valid license (license for Exchange Online Mailbox).
There is no requirement for purchasing a “detected” license for this purpose. The only “issue” that we should consider regarding the recipient name (the Office 365 users that we use for authenticating to the Exchange Online server) is that by default, each of the communications that will relay to the Exchange Online server will include this recipient name in the from field.
2. Firewall settings
To enable the IIS SMTP server to create a communication channel to the Exchange Online, we need to create in the organization Firewall, an outbound rule which allows the IIS SMTP to use TLS (Port 587 or Port 25).
3. Office 365 mail server entity | Hostname
To be able to refer the Exchange Online server, Office 365 use a general Hostname: smtp.office365.com
In case that you want to find the information about the Exchange Online server name, use the following instructions
- Login to Office 365 portal
- Access OWA (Mail) client
- In the top menu click on the Settings icon
- Choose the Options menu
- On the left side menu bar choose the POP and IMAP menu
- in the bottom of the page, click on the Settings for POP or IMAP
- In the windows that appear, look for the section: SMTP settings
here, you can find the Exchange Online server name (smtp.office365.com) and additionally, we can see that there is a mandatory requirement for using TLS protocol (port 587 or port 25).
 Send Unlimited Bulk Emails at $20. Signup for free.
Installing and configuring the IIS SMTP server
In this section, we will explain how to install IIS SMTP server on a Windows 2008 server.
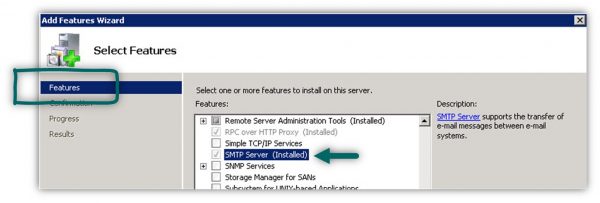
Step 1: Install IIS Server
- Open Server Manager Console and under Features select Add Features
- Select the option of SMTP Server
(The reset of the installation process is just next, next, etc.)
Step 2: IIS SMTP Service
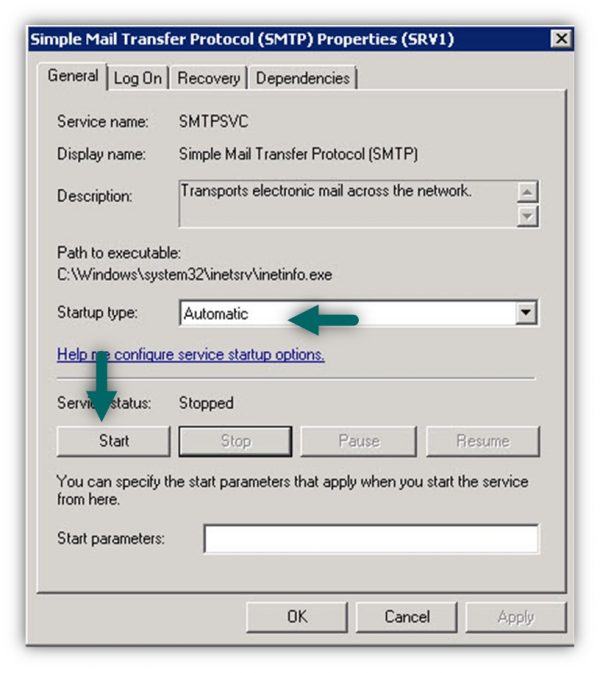
By default, the IIS SMTP service is not started, and the startup type is: manual

- We will need to change the default setting to – Automatic.
Double click on the SMTP Service: Simple Mail Transfer Protocol (SMTP) and, change the Startup type to Automatic - Start the IIS SMTP service (SMTPSVC)
Step 3: IIS SMTP Server MMC
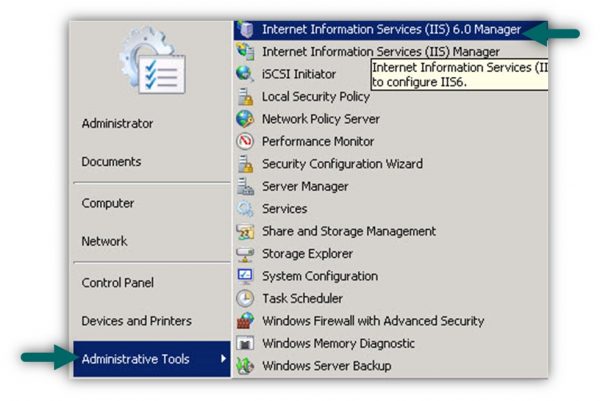
The management console for the IIS SMTP is Internet Information Services 6.0.
(There is no option of managing the IIS SMTP using the “standard” IIS 7 Management console). We can find the IIS 6.0 Manager under Administrative Tools -> Internet Information Services 6.0

Part 2 – Configuring IIS server as mail relay for Office 365 environment
In the following section, we will review all of the required settings for configuring the IIS SMTP server as a “SMTP Relay.”
1. IIS SMTP relay “LAN interface.”
The first part relates to the: settings for the interface or the “IIS Leg” that serves the LAN Hosts (Mail enabled Devices\Applications).
Open the IIS SMTP management console, right click on the
[SMTP Virtual Server #1] and choose: Properties
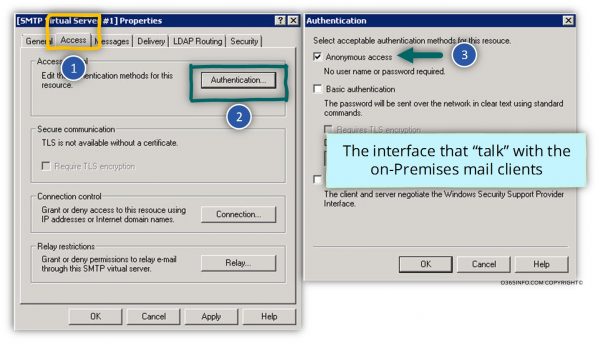
1. Access tab | Authentication
Select the Access tab -> Authentication
In the Authentication windows choose the option: Anonymous access (Mail enabled Devices\Applications doesn’t need to use authentication).
2. Access tab | Relay
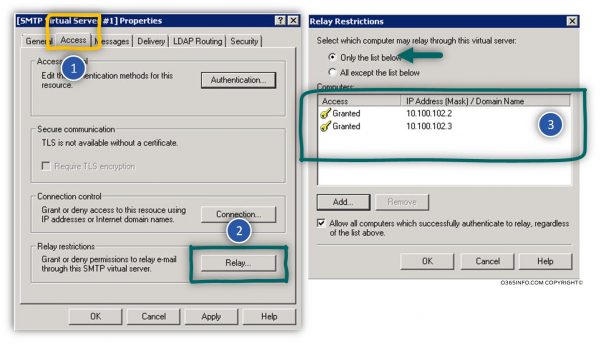
The “relay” settings use for configuring the IP address of the: Mail enabled Devices\Applications that will communicate (relay mail) to the IIS SMTP server.
In our example, we have two hosts who need to send mail to the IIS SMTP server:
Help Desk application that installed on a workstation with the IP address 10.100.102.2 and, FAX device that uses the IP address: 10.100.102.3
To enable this Hosts to send (Relay) mail to the IIS SMTP server, we will need to add this IP address to the “allowed list.”
Select the Acesss tab -> click on the Relay… button.
In the Relay restriction window, add the IP address of the Mail enabled Devices\Applications that will communicate (relay mail) to the IIS SMTP server.
2. IIS SMTP mail relay “cloud” interface
In this section, we will create the required settings that enable the IIS SMTP server to relay mail messages to the Exchange Online server.
Delivery Tab
The Delivery tab, use for configuring the IIS SMTP “interface” that communicate with the Exchange Online server.
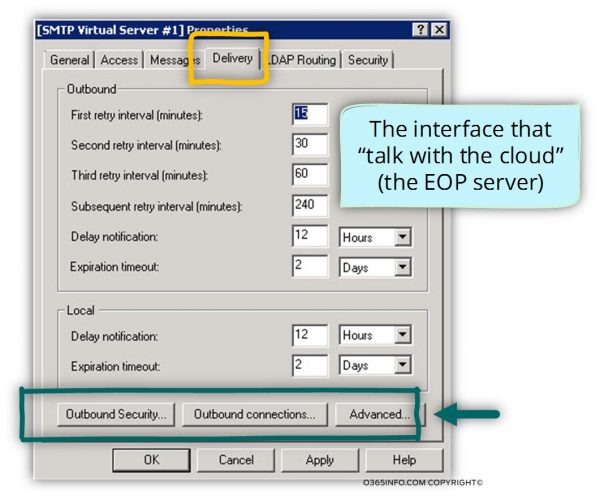
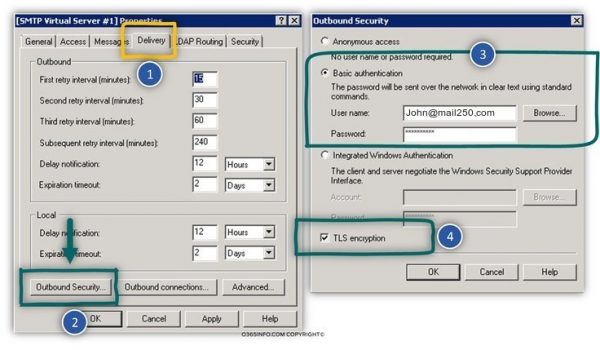
1. Delivery Tab | Outbound security
Select the Delivery tab -> Outbound Security option.
In the Outbound Security window select the option: Basic Authentication
We will need to provide the Office 365 user credentials which have Exchange Online Mailbox.
In our example, we will use the credentials of a user named: John@mail250.com
Select the Delivery tab -> Outbound Security option.
In the Outbound Security window select the option: TLS encryption (for creating a secure communication channel to Exchange Online).
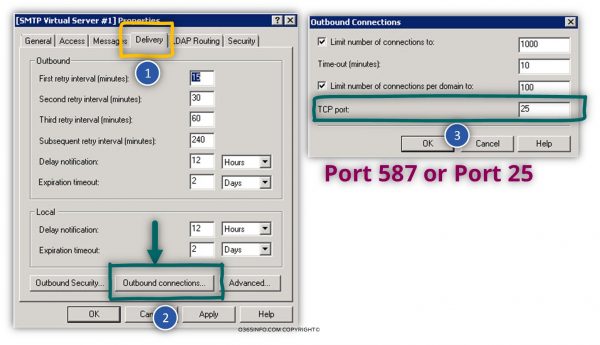
2. Delivery Tab | TCP port
Select the Delivery tab -> Outbound Connection option.
The TLS port number that we use for communicating with the Exchange Online is:25 (or Port 587)
(Please verify that the organization Firewall will have the required outbound rule that will enable the IIS SMTP Server to use this port ).
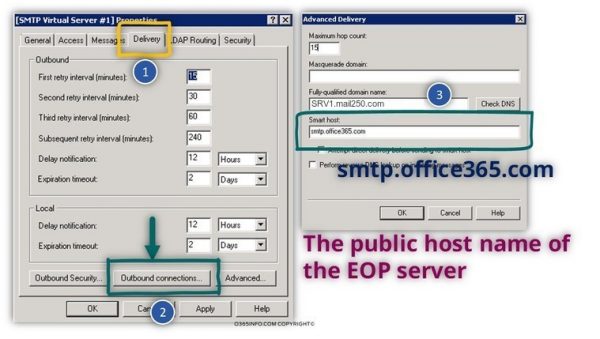
3. Delivery Tab | Advanced
Select the Delivery tab -> Advanced option
In the Smart host text box, we need to provide the Exchange Online server name.
The section of Fully qualified domain name is not a mandatory requirement. You can add the FQDN of the IIS SMTP server.
Troubleshooting:
How to Troubleshoot SMTP Relay?


1 Comment.
Thanks to my father who shared with me concerning this blog, this blog is genuinely awesome.