How Can We Help?
How to Import Contacts/ Upload List?
Our import subscriber lists feature allows you to add a list of contacts to Mail250. You can also use this feature to auto-update multiple existing contacts at once.
To get started, you’ll need a blank sheet in a spreadsheet program like Microsoft Excel or Google Sheets, saved or exported as a comma separated value (CSV) file.
Import New Contacts / Upload List
There are a few different ways to import contacts to Mail250, but a file upload is the most common method. The file import process has two parts: First, you’ll prepare your spreadsheet of contacts outside of Mail250, and save it as a CSV file. Next, you’ll use our import tool to add your contacts to Mai250.
Prepare for Import
To prepare your file for import, follow these steps.
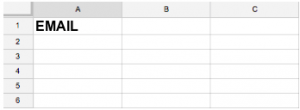
- In a spreadsheet program like Excel or Google Sheets, open your blank worksheet.
- Create and label a column for EMAIL.
- Next to your EMAIL column, create and label additional columns for FIRST_NAME.
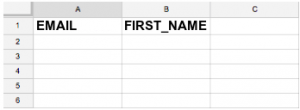 EMAIL is the only field that we require, but you can repeat this step for any other contact data fields you want to include in Mail250, like last name, phone number, birthday, language, address, or country. But, before adding other contact data you need to first create that data fields in the Manage Attribute section.
 - Check to know How to use Merge Tags/ Custom Fields to Send Personalized Campaigns?
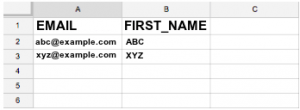
- Paste your contacts’ information into the relevant fields in the spreadsheet.
- Save the file in CSV format. This option can usually be accessed from the File menu in your spreadsheet program, labeled as “Export as .CSV” or “Download as .CSV”. Different spreadsheet programs will vary a little bit. If you use another file type, we won’t be able to process the file.
Import Your List
- Login in to your account.
- Click on the side menu “Lists -> All Lists”.
- CLick on create list button.
- Enter the list name and click on “Add list” button.
- Choose “Upload a CSV file”
- Click on the “Upload file” button and select the CSV file from your computer.